
[JS] 모던 Javascript Deep Dive 25장 - 클래스
업데이트:
[01] ES6 이후 클래스의 등장
자바스크립트는 프로토타입 기반 객체 지향 언어이다.
ES5에서는 클래스 없이 생성자 함수와 프로토타입만으로도 객체지향 언어의 상속을 구현할 수 있었다.
클래스 기반 언어에 익숙한 프로그래머들을 위해 ES6부터 자바스크립트에도 클래스가 등장했다.
그런데 나는 클래스 기반 언어에 익숙한 프로그래머는 아니므로 클래스 개념도 새로 배워가야 할 것 같다.
자바스크립트에서 클래스는 생성자 함수와 매우 유사하게 동작하지만 아래와 같은 차이가 있다고 한다.
🔍 생성자 함수와 클래스의 차이
1️⃣ 클래스를 new 연산자 없이 호출하면 에러가 발생.
2️⃣ 클래스는 상속을 지원하는 extends와 super 키워드를 제공한다.
3️⃣ 클래스는 호이스팅이 발생하지 않는 것처럼 동작한다. let, const 키워드로 선언한 변수처럼 호이스팅 된다. (TDZ에 빠짐)
4️⃣ 클래스 내의 모든 코드에는 암묵적으로 strict mode가 지정되어 실행된다.
5️⃣ 클래스의 constructor, 프로토타입 메서드, 정적 메서드는 모두 프로퍼티 어트리뷰트 [[Enumerable]] (열거 가능한) 의 값이 false다.
특징 중에 눈에 띄는 것은 extends 와 super 키워드가 생겼다는 점인 것 같다 !
이 두 친구가 상속 관계 구현을 더욱 간결하고 명료하게 한다고 하는데 더 자세히 알아보아야 할 것 같다.
일단 이제 본격적으로 클래스가 무엇인지 어떻게 쓰는지 알아보자.
[02] 클래스 정의
사실 자바스크립트에서 클래스는 함수의 한 종류라고 한다.
class User {
  constructor(name) {
    this.name = name;
  }
  sayHi() {
    console.log(this.name);
  }
}
//User가 함수라는 증거
alert(typeof User); // function
위 코드를 한줄한줄 분석하여 클래스가 어떻게 작동하는지 알아보자.
먼저 class 키워드로 User 라는 함수를 만들어주었다.
User함수의 본문(this)는 생성자 메서드 constructor에서 가져오고 생성자 메서드가 없으면 빈 객체로 만들어진다.
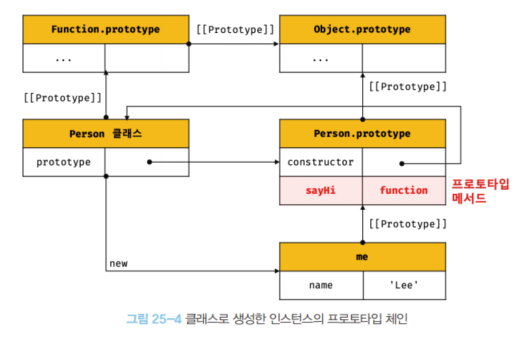
그리고 sayHi 메서드는 User.prototype에 저장된다.
클래스 표현식
// 익명 클래스 표현식
const Person = class {};
// 기명 클래스 표현식
const Person = class MyClass {};
클래스는 표현식으로도 정의할 수 있다.
🔍 생성자 함수와 클래스의 비교

위 그림을 보면 정의 방식이 형태적으로 봤을 때 매우 유사하지만 내부 키워드들만 변화가 있어 보인다.
클래스의 키워드와 메서드 정의 방식들은 뒤에서 더 자세히 살펴보자
[03] 클래스 호이스팅
const Person = "";
{
  console.log(Person); // ReferenceError: Cannot access 'Person' **before initialization**
  // 클래스 호이스팅이 발생하지 않는다면 const로 선언한 ''가 출력되어야 한다.

  class Person {}
}
클래스로 선언한 Person{} 은 선언은 이루어졌지만 초기화는 이루어지지 않아 일시적 사각지대에 빠져서 호이스팅이 발생하지 않는 것처럼 동작한다.
클래스 선언문도 호이스팅이 발생하지만 let, const 키워드로 선언한 변수처럼 호이스팅된다고 이해하면 된다.
[04] 인스턴스 생성
클래스도 생성자함수이기 때문에 인스턴스를 생성한다.
class Person {}

const me = Person();
//TypeError: Class constructor Foo cannot be invoked without 'new'
클래스가 new 연산자와 함께 호출되지 않고 단독으로 호출되면 타입 에러가 발생한다.
const Person = class MyClass {};
const me = new Person();

console.log(MyClass); // ReferenceError: MyClass is not defined

const you = new MyClass(); // ReferenceError: MyClass is not defined
클래스 표현식으로 정의된 클래스는 식별자를 이용하지 않고 클래스 이름으로 인스턴스를 생성하면 에러가 발생한다.
[05] 메서드
클래스 몸체 안에서 메서드를 정의할 수 있는데 총 3가지 종류가 있다.
- constructor(생성자)
- 프로토타입 메서드
- 정적 메서드
1) constructor
constructor는 앞에서도 배운적 있는 개념이다. 복습하고 넘어가자면 constructor는 생성자 함수가 생성될 때 프로토타입에 constructor 프로퍼티를 가지게 된다고 배웠다(19.3절)
하지만 클래스의 constructor 메서드와 프로토타입의 constructor 프로퍼티와는 다른 개념이다.
클래스에서 constructor 메서드라는 것은 무슨 의미인지 알아보자.
🔍 정의
☝🏻 인스턴스를 생성하고 객체 내부를 초기화하기 위한 특수한 메서드이다.
constructor 라는 용어는 잘 와닿지 않아서 앞으로는 생성자 메서드라고 부르겠다 !
class Person {
  // constructor(생성자). 이름을 바꿀 수 없다.
  constructor(name) {
    // this는 클래스가 생성할 인스턴스를 가리킨다.
    this._name = name;
  }
}

// 인스턴스 생성
const me = new Person("Lee");
console.log(me); // Person {_name: "Lee"}
constructor가 가진 특징들도 알아보자 !
클래스 내에 생성자 메서드는 최대 한개만 존재 가능
class Person{
	constructor() {}
	constructor() {}
}
//SyntaxError: A class may only have one constructor
생략하면 암묵적으로 빈 생성자 메서드를 정의
class Person {}
// 빈 constructor에 의해 빈 객체를 생성
고정값으로 인스턴스 초기화
class Person {
  constructor() {
    this.name = "Minhye";
    this.address = "Incheon";
  }
}
const me = new Person();
console.log(me); // Person {name: "Minhye", address: "Incheon"}
인수로 인스턴스 초기화
class Person {
  constructor(name, address) {
    this.name = name;
    this.address = address;
  }
}
const me = new Person("Minhye", "Incheon");
console.log(me); // Person {name: "Minhye", address: "Incheon"}
암묵적 this 바인딩
17장에서 생성자 함수의 인스턴스가 생성되면 리턴문을 작성하지 않아도 암묵적으로 this에 바인딩되어 리턴된다고 배운 적 있다.
이와 같이 constructor 내부에서도 this가 암묵적으로 바인딩되기 때문에 리턴문을 작성하지 않아야 한다.
class Person {
  constructor(name) {
    this.name = name;
  }
}
const me = new Person("Minhye");
console.log(me); // Person{ name = 'Minhye' }
2) 프로토타입 메서드
class Person {
  constructor(name) {
    this.name = name;
  }
  sayHi() {
    console.log(`Hi! My name is ${this.name}`);
  }
}
const me = new Person("Lee");
me.sayHi(); // Hi! My name is Lee
키워드 없이 sayHi() 메서드를 생성하면 prototype 프로퍼티에 추가하지 않아도 기본적으로 프로토타입 메서드가 된다.
3) 정적 메서드
☝🏻 인스턴스를 생성하지 않아도 호출할 수 있는 메서드
클래스에서는 메서드에 static 키워드를 붙이면 정적 메서드가 된다.
class Person {
  constructor(name) {
    this.name = name;
  }
  //정적 메서드
  static sayHi() {
    console.log(`Hi!`);
  }
}
Person.sayHi(); // Hi!

const me = new Person("Lee");
me.sayHi(); // TypeError: me.sayHi is not a function
인스턴스로 호출할 수 없고 그냥 클래스로 호출해야한다.
인스턴스로 호출할 수 없는 이유는 프로토타입 체인 상에 클래스가 존재하지 않기 때문이다.
04) 정적 메서드와 프로토타입 메서드의 this 바인딩 차이
this는 어디서 호출했는가에 의해 결정되는 친구였다.
그런데 정적 메서드는 클래스로 호출했고 프로토타입 메서드는 인스턴스 객체로 호출했기 때문에 this 바인딩이 다를 것이다.
class Square {
  constructor(width, height) {
    this.width = width;
    this.height = height;
  }
  //프로토타입 메서드
  area() {
    //this가 square 객체를 가리킴
    return this.width * this.height;
  }
  //정적 메서드
  static sum(width, height) {
    // this가 클래스를 가리킴
    return width + height;
  }
}
//프로토타입 메서드로 호출
const square = new Square(10, 10);
console.log(square.area());
//정적 메서드로 호출
console.log(Square.sum(10, 10));
메서드 내부에서 인스턴스 프로퍼티를 참조할 필요가 있다면 this를 사용해야 하고 이러한 경우 프로토타입 메서드로 정의해야한다.
this를 사용하지 않더라도 프로포타입 메서드로 정의할 수 있긴 하지만 인스턴스를 생성한 다음 호출해야 하므로 this를 사용하지 않아도 되는 정적 메서드로 정의하는 것이 좋다고 한다.
05) 클래스에서 정의한 메서드의 특징
- function 키워드를 생략한 메서드 축약 표현을 사용
- 콤마가 필요 없다.
- 암묵적으로 strict mode가 실행
- for …in 문이나 Object.keys 메서드로 열거불가능. [[Enumerable]]의 값이 false이다.
- 내부 메서드 [[Construct]]를 갖지 않는 non-constructor이다. 따라서 new 연산자와 함께 호출할 수 없다.
[06] 클래스의 인스턴스 생성 과정
class Person {
  constructor(name) {
    //1. 암묵적으로 인스턴스가 생성되고 this에 바인딩
    console.log(this); // Person{}
    console.log(Object.getPrototypeOf(this) === Person.prototype); //true

    //2. this에 바인딩되어 있는 인스턴스를 초기화
    this.name = name;

    //3. 완성된 인스턴스에 바인딩된 this가 암묵적으로 반환
  }
}
[07] 프로퍼티
1) 인스턴스 프로퍼티
인스턴스 프로퍼티는 constructor 내부에서 정의해야 한다.
class Person {
  constructor(name) {
    this.name = name;
  }
}
const me = new Person("Minhye");
console.log(me); //Person {name='Minhye'}
그리고 인스턴스 프로퍼티는 언제나 ‘public’이다.
private한 프로퍼티를 정의하는 방법은 25.7.4절에서 다룬다.
2) 접근자 프로퍼티
class Person {
  constructor(firstName, lastName) {
    this.firstName = firstName;
    this.lastName = lastName;
  }

  get fullName() {
    return `${this.firstName} ${this.lastName}`;
  }

  set fullName(name) {
    [this.firstName, this.lastName] = name.split(" ");
  }
}
const me = new Person("Minhye", "Kang");

console.log(`${me.firstName} ${me.lastName}`); // Minhye Kang

// 접근자 프로퍼티 fullName에 값을 저장하면 setter 함수가 호출
me.fullName = "Maru Kang";
console.log(me); // Person {firstName: "Maru", lastName: "Kang"}

// 접근자 프로퍼티 fullName에 접근하면 getter 함수가 호출
console.log(me.fullName); //Maru Kang

console.log(Object.getOwnPropertyDescriptor(Person.prototype, "fullName"));
접근자 프로퍼티는 getter 함수와 setter 함수로 구성되어 있다.
getter는 호출하는 것이 아니라 참조 시에 참조하는 형식으로 사용한다.
setter도 호출하는 것이 아니라 값을 할당 시에 내부적으로 setter가 호출된다.
getter는 이름 그대로 무언가를 취득할 때 사용하므로 반드시 무언가를 반환해야 하고 setter는 무엇가를 프로퍼티에 할당해야할 때 사용하므로 매개변수가 있어야 한다.
3) 클래스 필드 정의 제안
📌 클래스 필드 : 자바스크립트의 생성자 함수에서 this에 추가한 프로퍼티를 클래스 기반 객체지향 언어에서는 클래스 필드라고 부른다.
클래스 몸체에는 메소드만 선언할 수 있다.
변수를 생성자 함수에서처럼 클래스 몸체안에서 덜렁 선언하면 에러가 발생한다. 변수의 선언과 초기화는 반드시 constructor 메서드 내부에서 해야한다.
class Foo {
  name = ""; // SyntaxError
  constructor() {}
}

class Bar {
  constructor(name = "") {
    this.name = name;
  }
}
const bar = new Bar("Lee");
console.log(bar); // Bar { name = 'Lee'}
하지만 최신 Node.js나 Chrome72 이상의 최신 브라우저에서 Foo() 함수를 실행시키면 문법 에러가 발생하지 않고 정상 동작한다고 한다.
이 챕터의 제목이 클래스 필드 정의 ”제안”인 이유가 여기에서 나온다.
클래스 몸체에서 클래스 필드를 정의하는 것은 아직 ECMAScript의 정식 표준 사양으로 승급되지 않았지만 미리 “클래스 필드 정의 제안”이라는 것을 구현해 두었다고 한다.
그래서 최신 브라우저와 최신 Node.js 에서는 클래스 필드를 클래스 몸체에 정의할 수 있는 것이다.
대신, 클래스는 생성자 함수에서 하던 방식과 다르게 클래스 필드를 this에 바인딩해서는 안된다.
class Person{
		this.name = ''
};
위 코드처럼 하면 안된다는 것이다.
📌 클래스에서 this는 constructor와 메서드 내에서만 유효하다.
클래스 필드 내부의 함수
class Person {
  name = "Minhye";

  getName = function () {
    return this.name;
  };
}
const me = new Person();
console.log(me); // Person{ name:  "Minhye", getName: *f*}
console.log(me.getName()); // Minhye
함수는 일급 객체기 때문에 클래스 필드에 할당할 수 있다.
getName() 함수는 프로토타입 메서드가 아닌 인스턴스 메서드가 되어 클래스 필드에 함수를 할당하는 것은 권장하지 않는다고 한다.
인스턴스 프로퍼티를 정의하는 방식 두가지
- 외부 초기값으로 클래스 필드를 초기화할 필요가 있다면 constructor에서 인스턴스 프로퍼티를 정의하는 기존의 방식을 사용.
- 외부 초기값으로 클래스 필드를 초기화할 필요가 없다면 기존의 constructor 방식과 클래스 필드 정의 제안을 모두 사용할 수 있다.
4) private 필드 정의 제안
클래스의 인스턴스 프로퍼티는 언제나 public이라고 하였다.
그래서 21년 이후로 private한 필드를 정의할 수 있는 새로운 사양이 제안되어 있다.
🔍 사용 방법
class Person {
  #name = "";

  constructor(name) {
    this.name = name;
  }
}
const me = new Perosn("Lee");
//private 필드 #name은 클래스 외부에서 참조할 수 없다.
console.log(me.#name);
//SyntaxError: Private field '#name' must be declared in an enclosing class
클래스 내부에서 선언 시 private 필드 선두에 #을 붙여주면 되는데 참조할 때에도 #을 붙여주어야 한다.
위 코드 마지막 줄을 보면 private한 클래스의 외부에서 접근했더니 에러가 뜬 것을 확인할 수 있다.
📌 private 필드는 클래스 내부에서만 참조할 수 있다.
🔍 특징
- private 필드는 반드시 클래스 몸체에 정의해야 한다. constructor에 정의하면 에러가 발생
- 클래스 외부에서는 접근할 수 없지만 접근자 프로퍼티(get)를 통해 간접적으로 접근할 수 있다.
5) static 필드 정의 제안
위에서도 말했듯이 static 키워드를 이용하여 메서드를 정의할 수 있다는 것을 알고 있다.
최신 사양에서는 메서드 뿐만 아니라 정적 필드도 정의할 수 있다.
class MyMath {
  // 최신 브라우저와 최신 node.js 에서 추가된 static public 필드 정의
  static PI = 22 / 7;
  // static private 필드 정의
  static #num = 10;

  // 위에서 배웠던 정적 메서드
  static increment() {
    return ++MyMath.#num;
  }
}
console.log(MyMath.PI); // 3.142857142857143
console.log(MyMath.increment()); // 11
[08] 상속에 의한 클래스 확장
클래스에서 가장 핵심적인 내용이 상속이다.
프로토타입 챕터에서도 프로토타입 체인을 통한 상속으로 불필요한 중복을 줄일 수 있었다.
클래스에서 상속은 기존 클래스를 상속받아 새로운 클래스를 확장하여 정의하는 것이다.
🔍 상속의 장점
- 중복제거를 통해 코딩의 양을 줄일 수 있다.
- 먼저 생성된 class만 바꾸어도 확장된 클래스까지 동시다발적으로 바꿀 수 있어 효율적이다.
1) extends 키워드
상속을 통해 클래스를 확장할 때 extends 키워드를 사용하여 상속받을 클래스를 정의한다.
class Person {
  constructor(name, first, second) {
    this.name = name;
    this.first = first;
    this.second = second;
  }
  sum() {
    return this.first + this.second;
  }
}
class PersonPlus extends Person {
  avg() {
    return this.first + this.second / 2;
  }
}

var kim = new PersonPlus("kim", 10, 20);
console.log(kim.sum()); // 30
console.log(kim.avg()); // 20
위 코드에서 상속을 통해 확장된 PersonPlus 클래스를 서브클래스라고 하고, 상속된 클래스인 Person 클래스를 수퍼클래스라고 한다.
2) super 키워드
super 키워드는 함수처럼 호출가능하고 this와 같이 식별자처럼 참조할 수 있는 특수한 키워드다.
🔍 super 용법 두가지
-
super 호출
super()로 호출하면 부모(수퍼) 클래스의 생성자(constructor)를 호출한다. -
super 참조
super.xxx로 참조하면 부모 클래스의 메서드를 호출할 수 있다.
// 부모(수퍼) 클래스
class Person {
  constructor(name, first, second) {
    this.name = name;
    this.first = first;
    this.second = second;
  }
  sum() {
    return this.first + this.second;
  }
}
// 자식(서브) 클래스
class PersonPlus extends Person {
  constructor(name, first, second, third) {
    super(name, first, second); // 1) super 호출
    this.third = third;
  }
  sum() {
    return super.sum() + this.third; // 2) super 참조
  }
  avg() {
    return (super.sum() + this.third) / 3; // super 참조
  }
}

var kim = new PersonPlus("kim", 10, 20, 30);
var lee = new PersonPlus("Lee", 10, 20, 30);

console.log("kim.sum()", kim.sum());
console.log("lee.avg()", lee.avg());
위 코드는 super 용법 두가지를 모두 활용한 예시이다.
🎯 상속의 단점 극복
상속의 개념만을 활용하면 부모 클래스에서 받아온 값들을 다시 한번 호출해야되는 번거로움을 줄이면서 성능과 메모리를 절약할수 있다.
🎯 super의 이점
super 키워드는 부모가 이미 갖고 있는 기능과 나도 갖고 있는 기능의 중복을 제거할 수 있다.
3) 상속 클래스의 인스턴스 생성 과정
상속 관계에 있는 두 클래스가 협력하며 인스턴스를 생성하는 과정을 알아보자.
// 부모 클래스
class Rectangle {
  // 2) 부모클래스의 인스턴스 생성과 this 바인딩
  constructor(width, height) {
    // 3) 부모클래스의 인스턴스 초기화
    this.width = width;
    this.height = height;
  }
  // 면적을 구하는 메서드
  getArea() {
    return this.width * this.height;
  }
  // 문자열로 바꿔주는 메서드
  toString() {
    return `width = ${this.width}, height = ${this.height}`;
  }
}

// 자식 클래스
class ColorRectangle extends Rectangle {
  constructor(width, height, color) {
    super(width, height); // 1) 서브 클래스의 super 호출
    // 4) 서브클래스 constructor로의 복귀와 this 바인딩
    this.color = color; // 5) 서브클래스의 인스턴스 초기화
    //ColorRectangle { width: 2, height: 4, colorl: "red"}
    //완성된 인스턴스가 바인딩된 this가 암묵적으로 반환
  }
  //메서드 오버라이딩 - 부모 클래스에도 toStirng 메서드가 있음
  toString() {
    return super.toString() + `, color = ${this.color}`;
  }
}

const colorRectangle = new ColorRectangle(2, 4, "red");

console.log(colorRectangle);
ColorRectangle; // {width: 2, height: 4, color: "red"}
console.log(colorRectangle.getArea()); // 8
console.log(colorRectangle.toString()); // width = 2, height = 4, color = red
위 코드에서 super(width, height); 코드를 시작으로 순서를 따라가보면 어떠한 순서로 두 상속 관계가 협력하는지 알 수 있다.
댓글남기기