
[JS] 모던 Javascript Deep Dive 19장 - 프로토타입
업데이트:
[01] 객체지향 프로그래밍
자바스크립트를 이루고 있는 거의 모든 것이 객체다.
객체를 풀어서 설명하면, 상태 데이터인 프로퍼티와 상태 데이터를 조작하는 동작인 메서드를 하나의 논리적인 단위로 묶은 복합적인 자료구조라고 할 수 있다.
생성자 함수 파트에서 원을 하나의 객체로 나타낼 때 코드를 기억해보자.
반지름은 상태 데이터인 프로퍼티이고 원의 반지름을 이용하여 원의 넓이를 구하는 동작이 메서드라는 것이다.
[02] 상속과 프로토타입
📢 상속 : 어떤 객체의 프로퍼티 또는 메서드를 다른 객체가 상속받아 그대로 사용할 수 있는 것
자바스크립트는 프로토타입을 기반으로 상속을 구현하여 불필요한 중복을 제거한다.
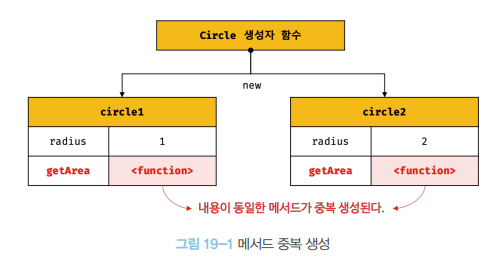
생성자함수를 생성해서 인스턴스를 여러개 만드는 방식으로 객체 리터럴에 비하면 불필요한 중복을 줄일 수 있었다.
그런데 이 방식에도 내용이 동일한 메서드가 중복 생성된다는 문제가 있다.
function Circle(radius){
	this.radius = radius;
	this.getArea = function(){
	return Math.PI * this.radius ** 2;
};
const circle1 = new Circle(1);
const circle2 = new Circle(2);

circle1; // Circle {radius: 1, getArea: f}
circle2; // Circle {radius: 2, getArea: f}
앞에서 배운 생성자 함수에서 프로토타입 기반 상속을 이용하여 메서드의 중복도 제거해보자.
function Circle(radius){
	this.radius = radius;
}
Circle.prototype.getArea = function(){
	return Math.PI * this.radius ** 2;
};
const circle1 = new Circle(1);
const circle2 = new Circle(2);

circle1; // Circle {radius:1}
circle2; // Circle {radius:2}
// 객체의 고유한 값만 존재를 하고 공통된 속성을 가진 getArea는 프로토타입 객체에 들어간다.
circle1.getArea(); //3.141592~~
프로토타입에 getArea 메서드를 넣음으로서 circle1과 circle2가 상속(참조)해서 쓰게 되는 것이다.
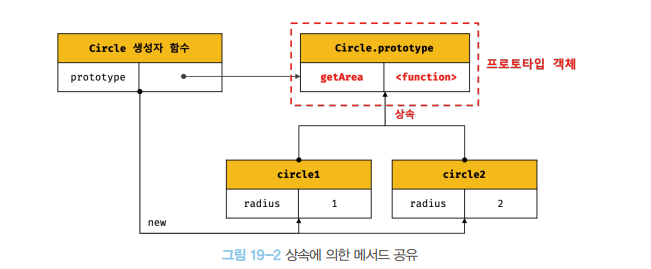
프로토타입 객체는 결국 객체 간 상속을 구현하기 위해 사용되는 것이다.
[03] 프로토타입 객체
모든 객체는 [[Prototype]]이라는 내부 슬롯을 가지는데 [[Prototype]] 내부 슬롯에는 직접 접근할 수 없고 proto 접근자 프로퍼티를 통해 간접적으로 접근할 수 있다고 배운바 있다.
proto 접근자 프로퍼티
접근자 프로퍼티이기 때문에 __proto__를 통해 프로토타입에 접근하면 [[Get]]이 호출된다. 새로운 프로토타입을 할당하면 [[Set]]이 호출된다.
const obj = {};
const parent = { x:1 };

obj.__proto__;
obj.__proto__ = parent;
//setter 함수인 set __proto__가 호출되어 obj 객체의 프로토타입을 교체

console.log(obj.x);
🔍 __proto__ 접근자 프로퍼티를 통해 프로토타입에 접근하는 이유
상호 참조에 의해 포로토타입 체인이 생성되는 것을 방지하기 위해서이다.
const parent = {};
const child = {};

child.__proto__ = parent;
parent.__proto__ = child; // TypeError: Cyclic __proto__ value
프로토타입 체인은 단방향 링크드 리스트로 구현되어야 한다.
위 코드에서 에러가 발생하지 않는다면 서로가 자신의 프로토타입이 되어 비정상적인 프로토타입 체인이 만들어진다.

📢 proto 접근자 프로퍼티를 코드 내에서 직접 사용하는 것은 권장하지 않는다.
무한루프가 발생할 수 있음.
함수 객체의 prototype 프로퍼티
[[Prototype]]은 모든 객체가 가지고 있는 내부 슬롯이었다. 그런데 prototype 프로퍼티는 함수 객체만이 가지고 있다.
prototype 프로퍼티는 생성자 함수가 생성할 인스턴스의 프로토타입을 가리킨다.
// 생성자 함수
function Person(name) {
this.name = name;
}
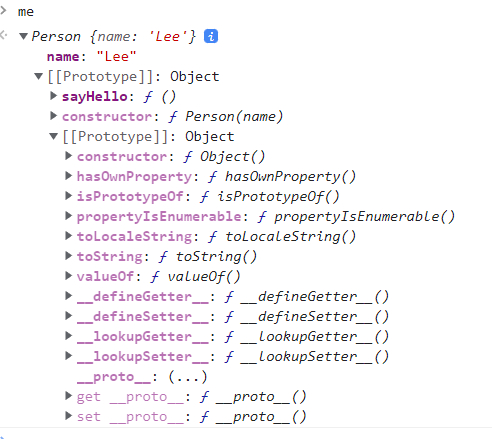
const me = new Person('Lee');
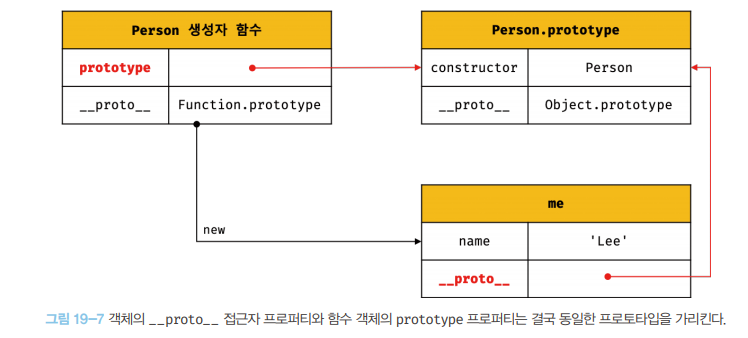
// 결국 Person.prototype과 me.__proto__는 결국 동일한 프로토타입을 가리킨다.
console.log(Person.prototype === me.__proto__); // true
me에 __proto__접근자 프로퍼티로 접근한 것과 me의 생성자 함수 Person에 prototype으로 접근한 것이 같다는 것을 알 수 있다.
이 둘은 동일한 프로토타입을 가리키지만 프로퍼티를 사용하는 주체(모든객체/생성자함수)가 다른것이다.
프로토타입의 constructor 프로퍼티와 생성자 함수
생성자 함수가 생성될 때, constructor 프로퍼티를 가지게 된다.
function Person(name) {
	this.name = name;
}
const me = new Person('Lee');
console.log(me.constructor === Person); //true
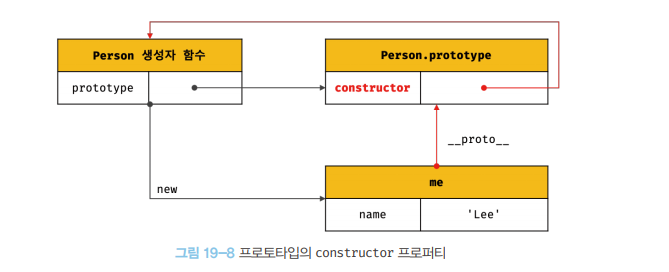
me 객체에는 constructor 프로퍼티가 없지만 me 객체의 프로토타입인 Person.prototype 에는 constructor 프로퍼티가 있다. me 객체는 Person.prototype의 constructor 프로퍼티를 상속받아 사용하는 것이다.
constructor 프로퍼티를 사용하면 객체의 생성자 함수가 무엇인지 찾아낼 수 있다.
constructor 프로퍼티가 가리키는 것은 무엇인지 그림을 통해 확인해보자
[04] 리터럴 표기법에 의해 생성된 객체의 생성자 함수와 프로토타입
// 객체 리터럴
const obj = {};
obj.constructor; //Object()

// 함수 리터럴
const add = function (a, b) { return a + b; };
add.constructor; //Function()

// 배열 리터럴
const arr = [1, 2, 3];
arr.constructor; //Array()

// 정규표현식 리터럴
const regexp = /is/ig;
regexp.constructor; //RegExp()

const a = 'string';
a.constructor; //String()
위 예제들은 모두 생성자 함수가 아니라 객체 리터럴에 의해 생성된 객체다.
그런데 모두 constructor 프로퍼티가 용도에 맞게 출력이 되는 것을 볼 수 있다.
리터럴 표기법에 의해 생성된 객체도 상속을 위해 프로토타입이 필요하다.
그래서 가상적인 생성자 함수를 갖는 것이다.
📢 객체 리터럴에도 프로토타입이 있고 가상의 생성자 함수를 갖는다.
결론은 모든 객체는 생성자 함수를 가진다는 것이다 !
[05] 프로토타입의 생성 시점
프로토타입의 생성 시점은 생성자 함수가 생성되는 시점에 생성된다.
사용자 정의 생성자 함수와 프로토타입 생성 시점
// 함수 정의(constructor)가 평가되어 함수 객체를 생성하는 시점에 프로토타입도 더불어 생성된다.
console.log(Person.prototype); // {constructor: ƒ}

// 생성자 함수
function Person(name) {
  this.name = name;
}
런타임보다 함수 선언이 먼저 이루어져서 prototype이 있다고 확인된다.
그런데 생성자 함수로써 호출할 수 없는 화살표 함수(non-constructor)는 에러가 발생한다.
// 화살표 함수는 non-constructor다.
const Person = name => {
  this.name = name;
};

// non-constructor는 프로토타입이 생성되지 않는다.
console.log(Person.prototype); // undefined
빌트인 생성자 함수와 프로토타입 생성 시점
모든 빌트인 생성자 함수는 전역 객체가 생성되는 시점에 생성된다고 한다.
생성된 프로토타입은 빌트인 생성자 함수의 prototype 프로퍼티에 바인딩된다.
[06] 객체 생성 방식과 프로토타입의 결정
객체 생성 방식은 다음과 같다.
- 객체 리터럴
- Object 생성자 함수
- 생성자 함수
- Object.create 메서드
- 클래스(ES6)
각 방식은 모두 추상 연산 OrdinaryObjectCreate에 의해 생성된다.
객체 리터럴에 의해 생성된 객체의 프로토타입
const obj = { x: 1 };

// 객체 리터럴에 의해 생성된 obj 객체는 Object.prototype을 상속받는다.
console.log(obj.constructor === Object); // true
console.log(obj.hasOwnProperty('x'));    // true
Object 생성자 함수에 의해 생성된 객체의 프로토타입
객체 리터럴과 비슷하다.
const obj = new Object();
obj.x = 1;

// Object 생성자 함수에 의해 생성된 obj 객체는 Object.prototype을 상속받는다.
console.log(obj.constructor === Object); // true
console.log(obj.hasOwnProperty('x'));    // true
생성자 함수에 의해 생성된 객체의 프로토타입
function Person(name) {
  this.name = name;
}

const me = new Person('Lee');
const you = new Person('Kim');

// 프로토타입 메서드
Person.prototype.sayHello = function () {
  console.log(`Hi! My name is ${this.name}`);
};

me.sayHello();  // Hi! My name is Lee
you.sayHello(); // Hi! My name is Kim
생성자 함수로 객체를 생성한 코드이다.
me와 you 인스턴스가 sayHello() 메서드 코드가 나오기 전이지만 Person 함수가 선언된 시점에 이미 prototype 객체가 생성되었고 sayHello를 나중에 선언해주어도 prototype 객체에 들어가는 것이기 때문에 문제없이 출력이 된다.
[07] 프로토타입 체인
스코프 체인처럼 프로토타입에도 체인이 존재한다.
function Person(name) {
  this.name = name;
}

// 프로토타입 메서드
Person.prototype.sayHello = function () {
  console.log(`Hi! My name is ${this.name}`);
};

const me = new Person('Lee');

// hasOwnProperty는 Object.prototype의 메서드다.
console.log(me.hasOwnProperty('name')); // true
me 객체는 hasOwnProperty를 어떻게 가지고 있는걸까?
me 객체의 상위 스코프는 생성자 함수 Person이다. 그런데 또 Person의 상위 스코프는 prototype이고 prototype의 상위 스코프이자 스코프 체인의 종점인 Object 까지 올라가서 hasOwnProperty를 찾아낸 것이다.
✍ 프로토타입 체인의 최상위에 위치하는 객체는 언제나 Object.prototype이다.
[08] 오버라이딩과 프로퍼티 섀도잉
📢 상속 관계의 의해 프로퍼티가 가려지는 현상을 프로퍼티 섀도잉이라 한다.
//즉시실행함수
const Person = (function () {
  // 생성자 함수
  function Person(name) {
    this.name = name;
  }

  // 프로토타입 메서드
  Person.prototype.sayHello = function () {
    console.log(`Hi! My name is ${this.name}`);
  };

  // 생성자 함수를 반환
  return Person;
}());

const me = new Person('Lee');

// 인스턴스 메서드
me.sayHello = function () {
  console.log(`Hey! My name is ${this.name}`);
};

// 인스턴스 메서드가 호출된다. 프로토타입 메서드는 인스턴스 메서드에 의해 가려진다.
me.sayHello(); // Hey! My name is Lee
me 객체는 자신과 가장 가까운 sayHello를 찾고 멈췄다.

프로토타입도 sayHello 메서드를 가지고 있고 인스턴스도 sayHello 메서드를 가지고 있다. 같은 이름이지만 프로토타입의 sayHello에 덮어쓰여지지 않고 인스턴스 프로퍼티로 새롭게 추가되어 프로토타입 메서드 sayHello는 가려진다. 이것을 프로퍼티 섀도잉이라고 한다.
오버라이딩
상위 클래스가 가지고 있는 메서드를 하위 클래스가 재정의하여 사용하는 방식
프로퍼티 삭제
하위 객체를 통해 프로토타입의 프로퍼티를 변경이나 삭제하는 것은 불가능하다. 프로토타입 프로퍼티를 변경 하려면 하위 객체를 통해 접근하는 것이 아니라 프로토타입에 직접 접근해야 한다.
[09] 프로토타입의 교체
프로토타입은 생성자 함수 또는 인스턴스에 의해 교체할 수 있다.
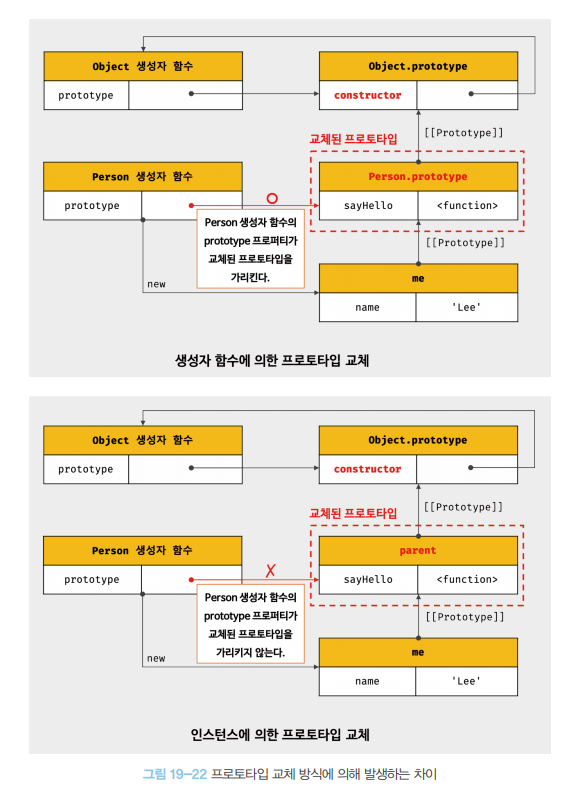
생성자 함수에 의한 프로토타입 교체
const Person = (function () {
  function Person(name) {
    this.name = name;
  }

  // ① 생성자 함수의 prototype 프로퍼티를 통해 프로토타입을 교체
  Person.prototype = {
    sayHello() {
      console.log(`Hi! My name is ${this.name}`);
    }
  };

  return Person;
}());

const me = new Person('Lee');
Person 생성자 함수의 프로토타입 객체를 sayHello 메서드를 가진 객체로 바꿔주었다. 객체 리터럴에는 constructor가 없어서 me의 constructor는 Person이 아니라 더 상위 객체인 Object를 가리키게 된다.
프로토타입을 교체하면 constructor 프로퍼티와 생성자 함수 간의 연결이 파괴되는데 constructor 프로퍼티를 되살리는 방법이 있다.
const Person = (function () {
  function Person(name) {
    this.name = name;
  }

  // 생성자 함수의 prototype 프로퍼티를 통해 프로토타입을 교체
  Person.prototype = {
    // constructor 프로퍼티와 생성자 함수 간의 연결을 설정
    constructor: Person,
    sayHello() {
      console.log(`Hi! My name is ${this.name}`);
    }
  };

  return Person;
}());

const me = new Person('Lee');

// constructor 프로퍼티가 생성자 함수를 가리킨다.
console.log(me.constructor === Person); // true
console.log(me.constructor === Object); // false
인스턴스에 의한 프로토타입의 교체
function Person(name) {
  this.name = name;
}

const me = new Person('Lee');

// 프로토타입으로 교체할 객체
const parent = {
  sayHello() {
    console.log(`Hi! My name is ${this.name}`);
  }
};

// ① me 객체의 프로토타입을 parent 객체로 교체한다.
Object.setPrototypeOf(me, parent);
// 위 코드는 아래의 코드와 동일하게 동작한다.
// me.__proto__ = parent;

me.sayHello(); // Hi! My name is Lee
인스턴스에 의한 프로토타입의 교체도 constructor가 없어지고 연결이 끊긴다.
아래 코드는 연결을 다시 되살리는 방법이다.
function Person(name) {
  this.name = name;
}

const me = new Person('Lee');

// 프로토타입으로 교체할 객체
const parent = {
  // constructor 프로퍼티와 생성자 함수 간의 연결을 설정
  constructor: Person,
  sayHello() {
    console.log(`Hi! My name is ${this.name}`);
  }
};

// 생성자 함수의 prototype 프로퍼티와 프로토타입 간의 연결을 설정
Person.prototype = parent;

// me 객체의 프로토타입을 parent 객체로 교체한다.
Object.setPrototypeOf(me, parent);
// 위 코드는 아래의 코드와 동일하게 동작한다.
// me.__proto__ = parent;

me.sayHello(); // Hi! My name is Lee

// constructor 프로퍼티가 생성자 함수를 가리킨다.
console.log(me.constructor === Person); // true
console.log(me.constructor === Object); // false

// 생성자 함수의 prototype 프로퍼티가 교체된 프로토타입을 가리킨다.
console.log(Person.prototype === Object.getPrototypeOf(me)); // true
위 두방식은 같은 것 같지만 미묘한 차이가 있는데 그림을 통해 확인해보자.
📢 프로토타입을 변경하는 것은 번거로우니 직접 교체하지 않는 것이 좋다!
[10] instanceof 연산자
📢 이항 연산자로서 좌변의 객체를 가리키는 식별자, 우변에 생성자 함수를 가리키는 식별자를 피연산자로 받는다. 생성자 함수의 prototype에 바인딩된 객체가 좌변의 객체의 프로토타입 체인 상에 존재하면 true, 아니면 false로 평가된다.
어떤 객체가 생성자 함수의 인스턴스인지 확인하려면 instanceof 연산자를 사용하면 된다.
// 생성자 함수
function Person(name) {
  this.name = name;
}

const me = new Person('Lee');

// Person.prototype이 me 객체의 프로토타입 체인 상에 존재하므로 true로 평가된다.
console.log(me instanceof Person); // true

// Object.prototype이 me 객체의 프로토타입 체인 상에 존재하므로 true로 평가된다.
console.log(me instanceof Object); // true
me 객체가 Person의 인스턴스이기도 하고 그 상위 프로토타입인 Object의 인스턴스이기도 하므로 결과값이 모두 true가 된다.
🔍 instanceof 연산자의 동작 방식
// 생성자 함수
function Person(name) {
  this.name = name;
}

const me = new Person('Lee');

// 프로토타입으로 교체할 객체
const parent = {};

// 프로토타입의 교체
Object.setPrototypeOf(me, parent);

// Person 생성자 함수와 parent 객체는 연결되어 있지 않다.
console.log(Person.prototype === parent); // false
console.log(parent.constructor === Person); // false

// Person.prototype이 me 객체의 프로토타입 체인 상에 존재하지 않기 때문에 false로 평가된다.
console.log(me instanceof Person); // false

// Object.prototype이 me 객체의 프로토타입 체인 상에 존재하므로 true로 평가된다.
console.log(me instanceof Object); // true
생성자 함수 Person을 만들었고 me 인스턴스도 만들었고 parent를 객체로 만들었다. 그리고 me의 프로토타입을 parent로 바꿔준 상태에서 Person의 프로토타입과 parent와 같느냐 했을 때 그렇지 않다는 것을 알 수 있다.
[11] 직접 상속
Object.create에 의한 직접 상속
Object.create 메서드는 명시적으로 프로토타입을 지정하여 새로운 객체를 생성한다.
let obj = Object.create(Object.prototype, {
  x : { value:1, writable: true, enumerable:true, configurable:true}
});
객체 리터럴 내부에서 __proto__에 의한 직접 상속
const myProto = {x:10};
const obj = {
  y:20,
  __proto__:myProto;
};

console.log(Object.getPrototypeOf(obj) === myProto); //true
[13] 프로퍼티 존재 확인
in 연산자나 Object.prototype.hasOwnProperty 메서드를 사용하면 된다.
in 연산자를 사용하면 상속받은 모든 프로토타입 프로퍼티가 나오고
hasOwnProperty 메서드 사용하면 자기가 직접 가지고 있는 프로퍼티만 나온다.
🔍 in 연산자
- 사용법
* key: 프로퍼티 키를 나타내는 문자열
* object: 객체로 평가되는 표현식
key in object
const person = {
  name: 'Lee',
  address: 'Seoul'
};

// person 객체에 name 프로퍼티가 존재한다.
console.log('name' in person);    // true
// person 객체에 address 프로퍼티가 존재한다.
console.log('address' in person); // true
// person 객체에 age 프로퍼티가 존재하지 않는다.
console.log('age' in person);     // false
[14] 프로퍼티 열거
객체의 모든 프로퍼티를 순회하며 열거하려면 for… in 문을 사용한다.
const person = {
  name: 'Lee',
  address: 'Seoul'
};

// for...in 문의 변수 prop에 person 객체의 프로퍼티 키가 할당된다.
for (const key in person) {
  console.log(key + ': ' + person[key]);
}
// name: Lee
// address: Seoul
댓글남기기